Table of Contents
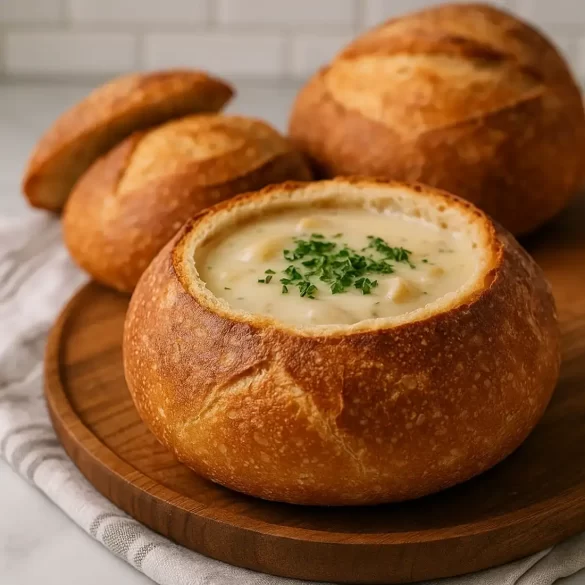
There’s something irresistibly comforting about a warm, crusty sourdough bread bowl brimming with creamy soup or hearty chili. It’s the edible vessel that makes every bite a little more special. Whether you’re making a cozy broccoli cheddar soup, clam chowder, or even chili, this homemade sourdough bowl takes your meal to the next level.
Making your own sourdough bread bowl from scratch isn’t just about impressing guests—it’s about flavor, texture, and tradition. With the natural tang of fermented sourdough and the golden crust that yields to a soft, chewy center, these bowls are way better than store-bought versions. And the best part? You don’t need to be a pro baker to master them!
In this guide, I’ll walk you through everything—from the ingredients to tips for shaping the perfect bowl. So, grab your starter and let’s bake the best Sourdough Bread Bowl you’ve ever tasted.

Why You’ll Love Making Sourdough Bread Bowl at Home
Flavor Meets Function: These sourdough buns aren’t just bread—they’re the foundation of a better burger. Naturally leavened for that signature sourdough tang, they deliver a deep, developed flavor you simply can’t buy off the shelf.
Soft Inside, Sturdy Outside: With a crust that’s just firm enough to hold up to juicy patties and an interior that’s fluffy and pillowy, these buns strike the perfect balance of texture and durability. Every bite is tender, yet satisfying.
A Fun, Delicious Twist on Burger Night: Why settle for store-bought when you can wow your family with homemade sourdough buns? They turn any burger into a gourmet experience—and let’s face it, there’s something incredibly fun about baking your own edible bun masterpiece!
Creative Uses Beyond Burgers: These buns aren’t just for patties. Serve them with soup for a cozy twist on a bread bowl, fill them with chicken salad for lunch, or hollow one out for dips on game day. They’re surprisingly versatile!
Hearty and Wholesome: Made with just a handful of simple ingredients and your sourdough starter, these buns skip the preservatives and additives found in packaged options. Plus, sourdough fermentation may make them easier to digest.
Great for All Seasons: From hearty winter meals to summer BBQs, sourdough burger buns fit in year-round. Toast them, stuff them, freeze them—these golden beauties are always ready to impress.
Beginner Friendly: This recipe uses an easy, mostly hands-off method. No fancy techniques—just stretch, fold, rise, and bake. Whether you’re new to sourdough or a seasoned baker, you’ll love the process and the results.
Ingredients for Sourdough Bread Bowl
Here’s what you’ll need to make six medium-sized Sourdough Bread Bowl.
- 500 grams (4 cups) bread flour
Gives structure and chewiness; use unbleached for best results. - 100 grams (1/2 cup) active sourdough starter (100% hydration)
Powers fermentation and adds signature sour flavor. - 350 grams (1 1/2 cups) lukewarm water
Hydrates the dough; warm water speeds fermentation. - 10 grams (2 teaspoons) fine sea salt
Enhances flavor and controls yeast activity. - Optional: 1 tablespoon olive oil (for softer crust)
Adds a touch of richness and makes the crust a little more tender.

How to Make Sourdough Bread Bowls (Step-by-Step)
1. Activate Your Starter
If your starter has been in the fridge, feed it 6-8 hours before baking. It should be bubbly and double in size before using.
2. Mix the Dough
In a large bowl, combine flour, starter, and water. Mix with a wooden spoon or your hand until no dry spots remain. It will look shaggy—that’s normal!
Let it rest (autolyse) for 30 minutes. Then, add salt and mix it in by hand until incorporated.
Pro Tip: Use the “pinch and fold” technique to distribute salt evenly without overmixing.
3. Bulk Fermentation (4–6 Hours)
Cover the bowl with a damp towel and let it sit at room temperature. Every 30 minutes for the first 2 hours, perform a stretch and fold to strengthen the gluten.
What’s a stretch and fold?
Grab a side of the dough, stretch it upward, then fold it over the center. Do this on all four sides.
After 4–6 hours, your dough should be puffy and slightly domed.
4. Divide and Pre-Shape
Turn dough onto a lightly floured surface. Divide into 6 equal portions (about 160–170 grams each). Shape each into a round ball and let them rest for 20 minutes.
5. Final Shaping
Re-shape each dough ball tightly by cupping your hands around it and turning on the counter to create surface tension.
Place seam side down onto a parchment-lined baking sheet or into individual floured bannetons if you have them.
6. Proof (8–12 Hours in Fridge)
Cover with plastic wrap and refrigerate overnight for a cold retard. This enhances the sour flavor and gives a beautiful crust.
Shortcut Option: If you’re in a hurry, proof at room temperature for 2–3 hours instead.
7. Preheat Oven & Score
Preheat oven to 450°F (230°C). Place a Dutch oven or baking stone inside if using.
Once preheated, take the dough out of the fridge. Score the tops with a razor blade or sharp knife—an X or a single slash works great.
Why score?
It allows the dough to expand in a controlled way during baking.
8. Bake
Transfer dough to a hot Dutch oven or baking sheet. Bake covered for 20 minutes (if using Dutch oven), then uncovered for another 20–25 minutes until deep golden brown.
No Dutch oven?
Bake directly on a tray with a pan of hot water in the oven to create steam.
Let them cool completely before cutting.
9. Hollow Out & Serve
Cut a circle on top and scoop out the inside with your hands or a spoon, leaving about 1-inch thick walls.
Save the inside bits for croutons, breadcrumbs, or dipping!

Pro Tips for the Perfect Sourdough Bowl
- Use mature starter: Make sure it’s bubbly and active before using.
- Don’t skip cold proofing: It enhances crust and flavor dramatically.
- Weigh your ingredients: Accuracy is key in bread baking.
- Steam = crispy crust: Bake with steam or cover for first half of bake.
- Avoid underbaking: The crust should be deep golden brown and sound hollow when tapped.

Serving Suggestions
Sourdough Bread Bowl are incredibly versatile and add that special rustic charm to any meal. Here are some creative serving ideas:
- Classic Broccoli Cheddar Soup
The rich, creamy texture pairs beautifully with the tang of sourdough. - Clam Chowder
Serve the traditional New England chowder in a sourdough bowl for ultimate comfort food vibes. - Beef Chili or Vegetarian Chili
Let the spicy, bold flavors soak into the bread—yes, it’s as good as it sounds! - Chicken Sandwiches:
Use these buns for crispy fried chicken, grilled chicken margherita, or buffalo-style sandwiches. - Breakfast Sandwiches:
Start your day strong by filling your bun with scrambled eggs, sausage, cheese, and a smear of herbed cream cheese or pesto. - Spinach Artichoke Dip
Perfect as an appetizer—just tear and dip the bowl after the dip is gone. - Breakfast Bowl
Fill with scrambled eggs, cheese, and crispy bacon for a brunch-worthy meal.
Hosting tip: Garnish with herbs, serve on a wooden board, and you’ve got an Instagram-ready dish.

Recipe Variations & Customizations
- Mini Sourdough Bowls
Make smaller versions for personal-sized servings or appetizer portions. - Whole Wheat Sourdough Bowls
Swap 1/3 of the bread flour for whole wheat flour for a nutty flavor and more fiber. - Cheesy Crust Bowls
Before baking, brush with egg wash and sprinkle grated parmesan on top for an extra punch. - Herb-Infused Dough
Mix in rosemary, thyme, or garlic powder for a flavor boost. - Vegan-Friendly
This recipe is naturally vegan—just be mindful of the fillings you add! - Gluten-Free Option
Use a gluten-free sourdough starter and blend of gluten-free flours. Note: texture will vary.

Recipe Tested & Notes
I tested this sourdough bread bowl recipe several times to find the best balance between a crisp crust and a soft, chewy interior. After experimenting with different hydration levels, proofing times, and baking methods, this version consistently produced sturdy bread bowls that held soup without becoming soggy too quickly.
Here are my testing notes:
- Bread flour gave a much chewier texture than all-purpose flour.
- An overnight cold proof developed a deeper sourdough flavor and made scoring easier.
- Baking with steam during the first part of baking created a beautifully blistered crust.
- Making each dough ball between 160 and 180 grams created the ideal serving size.
- Allowing the bread to cool completely before hollowing prevented the crust from cracking.
- Leaving about a 1-inch thick wall inside the bowl made it strong enough to hold creamy soups for 30 to 45 minutes.
After multiple batches, this became my favorite version because it delivers reliable results every time.
Mistakes I Made While Testing This Recipe
Even experienced bakers learn something from every batch. Here are the biggest mistakes I made while perfecting these sourdough bowls.
I baked them before they finished proofing
One batch went into the oven too early because I was impatient. The bowls looked nice outside but were dense inside and didn’t rise properly.
Lesson learned:
Always wait until the dough feels airy and slightly puffy before baking.
I made the walls too thin
The first time I hollowed the bowls, I removed too much bread.
The result?
Hot soup soaked through the bread after only a few minutes.
Now I always leave about one inch of bread around the sides and bottom.
I skipped the steam
Without steam, the crust became dull and didn’t expand as well.
Adding steam completely changed the appearance and texture.
I filled the bowls immediately after baking
Fresh bread is delicate.
When I added hot soup too soon, the crumb compressed and became gummy.
Cooling the bowls completely solved the problem.
I underbaked one batch
The bread looked golden, so I removed it early.
After cutting into it, the center was slightly underdone.
Now I always bake until the crust reaches a deep golden brown and sounds hollow when tapped.
Personal Cooking Tips Learned From Testing
After baking this recipe many times, these small tricks consistently improved my results.
Keep your starter at peak activity
I only mix the dough when my starter has doubled in size and is full of bubbles.
The dough rises faster and develops better flavor.
Don’t rush shaping
Creating good surface tension during shaping helps the bowls rise upward instead of spreading outward.
A tight dough ball makes a huge difference.
Use a kitchen scale
Bread recipes become far more reliable when ingredients are weighed instead of measured by volume.
Chill the dough overnight whenever possible
The extra time allows gluten to strengthen naturally while creating a more complex sourdough flavor.
Rotate the baking tray halfway
Every oven has hot spots.
Rotating the tray halfway through baking gives all the bowls an even golden crust.
Save every piece you remove
The bread removed from the center never goes to waste.
I use it for:
- Homemade croutons
- Garlic bread bites
- Breadcrumbs
- Bread pudding
- Stuffing
Why I Prefer This Version
I’ve tried many sourdough bread bowl recipes over the years, but I always return to this one.
Here’s why.
Perfect balance of crust and crumb
The crust stays crisp while the inside remains soft and chewy.
Strong enough for soup
The bowl doesn’t collapse halfway through dinner.
That’s incredibly important when serving creamy soups or chowders.
Naturally flavorful
Long fermentation creates a mild tang without becoming overly sour.
No unnecessary ingredients
Many recipes include sugar, butter, or commercial yeast.
This version relies almost entirely on natural sourdough fermentation for flavor and texture.
Easy to adapt
Once you master the basic dough, you can create:
- Mini bread bowls
- Large family-size bowls
- Sandwich rolls
- Dinner rolls
- Rustic artisan loaves
It is one of the most versatile sourdough doughs I make.
Storage Notes Based on Actual Testing
I tested several storage methods to see which kept the bread fresh the longest.
Room Temperature
Best for: 2 days
Store the cooled bread bowls inside a paper bag or bread box.
The crust stays crisp while the inside remains soft.
Avoid plastic bags because they soften the crust quickly.
Refrigerator
I generally don’t recommend refrigerating bread.
Testing showed the bread became stale faster than when stored at room temperature.
Freezer
This worked surprisingly well.
Wrap each cooled bread bowl tightly in plastic wrap, followed by aluminum foil or a freezer-safe bag.
They stayed fresh for nearly three months.
To reheat:
- Thaw at room temperature.
- Bake at 350 degrees Fahrenheit (175 degrees Celsius) for 8 to 10 minutes.
The crust becomes wonderfully crisp again.
Can the bowls be filled ahead?
Yes.
For parties, I often hollow the bowls several hours ahead.
I keep them covered at room temperature and fill them with hot soup just before serving.
This keeps the bread crisp much longer.
Equipment Used
Having the right equipment makes homemade sourdough much easier.
- Large mixing bowl
- Digital kitchen scale
- Dough scraper
- Bench scraper
- Danish dough whisk or wooden spoon
- Proofing basket (optional)
- Parchment paper
- Bread lame or very sharp razor blade
- Dutch oven or baking stone
- Baking tray
- Small oven-safe pan for creating steam
- Cooling rack
- Sharp bread knife
- Measuring cups and spoons (if not using a scale)
- Kitchen towel or plastic wrap for covering dough
Optional but helpful:
- Instant-read thermometer
- Silicone baking mat
- Spray bottle for adding steam
FAQs
Can I freeze sourdough bread bowls?
Yes! Wrap tightly in foil and freeze for up to 3 months. Reheat in the oven at 350°F until warmed through.
How long do sourdough bowls stay fresh?
They stay fresh for 1–2 days at room temperature. Store in a paper bag for best crust retention.
Can I make this with discard?
No, you need an active starter for rise and structure. Discard lacks the power to ferment the dough properly.
Can I skip cold proofing?
Yes, but you’ll sacrifice flavor and crust texture. It’s highly recommended for best results.
How do I make the crust extra shiny?
Brush the dough with water or egg wash just before baking.
Can I make larger sourdough bread bowls?
Absolutely. Divide the dough into four portions instead of six for extra-large bowls that are perfect for hearty soups.
Can I bake these without a Dutch oven?
Yes. Place a tray of boiling water on the bottom oven rack to create steam while baking.
Why did my bread bowl spread instead of rising?
Usually this happens because the dough was under-shaped, over-proofed, or lacked enough gluten strength.
How thick should I leave the walls?
Around 1 inch (2.5 centimeters) is ideal.
Anything thinner may leak.
Can I use whole wheat flour?
Yes.
Replace up to 30% of the bread flour with whole wheat flour without dramatically affecting texture.
What soups work best in a sourdough bread bowl?
Some of my favorites include:
- Broccoli cheddar soup
- New England clam chowder
- Loaded baked potato soup
- Creamy tomato soup
- French onion soup
- Chicken and wild rice soup
- Corn chowder
- Creamy mushroom soup
- Beef chili
- White chicken chili
Can I prepare the dough two days ahead?
Yes.
After the first day of cold fermentation, the dough can remain refrigerated for up to 48 hours before baking. The sour flavor will become slightly stronger.
How do I keep the bowl from getting soggy?
For creamy soups, brush the inside with melted butter or olive oil and bake for 5 minutes before filling. This creates a light moisture barrier.
Can I make these in an air fryer?
Not recommended. Most air fryers are too small and do not generate the steam needed for proper sourdough oven spring.
What can I do with leftover bread bowl scraps?
They’re perfect for:
- Homemade croutons
- Garlic bread
- Breadcrumbs
- Bread stuffing
- Breakfast casseroles
- Bread pudding
- Panzanella salad
- Cheese fondue dipping pieces

Substitutes & Ingredient Alternatives
If you’re missing a few ingredients or need a dietary workaround, here are some smart swaps:
- Bread Flour → All-Purpose Flour
Less chewy but still works. - Sourdough Starter → Commercial Yeast
Use 1/4 teaspoon instant yeast and adjust fermentation times (shorter). It won’t have the sour flavor though. - Salt → Kosher Salt
Increase slightly to match flavor strength. - No Dutch Oven?
Use a pizza stone or inverted baking sheet and add steam with a pan of water. - Lactose Intolerant?
No worries! These bowls are dairy-free—just be cautious with what you fill them with.
Nutritional Information (Per Medium Bowl)
Estimated based on standard ingredients.
- Calories: 230
- Carbohydrates: 46g
- Protein: 7g
- Fat: 1g
- Fiber: 2g
- Sugar: 0g
- Sodium: 390mg
Tip: Nutritional values vary based on size and ingredients used. Fillings will alter these values significantly.
Conclusion
There’s nothing quite like the magic of homemade sourdough bread bowls—the rustic aroma, the crackle of the crust, and the way it perfectly holds your favorite soup or stew. With a little patience and practice, you can easily make bakery-quality bowls right in your own kitchen.
Whether you’re preparing a comforting winter meal or impressing guests at your next dinner party, these bowls are guaranteed to elevate any dish.
Have you made these Sourdough Bread Bowl? Drop your thoughts, or questions in the comments—we love hearing from fellow bread enthusiasts!